Using the Time Clock
Learn how to track your work hours with simple one-tap clock in and clock out
What You'll Learn
- How to clock in and out for your shifts
- Tracking your hours worked
- Switching between tasks during your day
- Adding missed time entries
- Editing and managing your time entries
- Understanding time entry statuses
Work in Progress
This guide is currently being vetted for accuracy. If you have questions or need assistance, please contact us directly.
Overview
The Time Clock feature lets you track your work hours with simple one-tap clock in and clock out. Your hours are automatically calculated, submitted for approval, and can be exported for payroll processing.
Key Benefits:
- Accurate time tracking with automatic duration calculation
- Track what project and activity you're working on
- See your daily and weekly hours at a glance
- Add notes to your time entries
- Switch between tasks without clocking out
- Add missed entries if you forget to clock in or out
- View your time entry history
Accessing the Time Clock
Finding the Time Clock Page
The Time Clock is available from your main menu.
From Main Menu:
- On desktop: Access the menu from the top navigation bar
- On mobile: Tap the hamburger menu icon (☰) on the right
- Expand "Resources"
- Select "Time Clock"
Clocking In
When you arrive at work and are ready to start your day, clock in using the Time Clock page.
- Open the Time Clock page
- Look for the large "Clock In" button
- The clock icon will be orange (clocked out status)
Before clocking in, you can specify what project you're working on and what activity you'll be doing.
Project Selection:
- Tap the "Project" dropdown
- Select the job site or project you're working on
- This should match your schedule assignment
- Optional (unless required by your company)
Activity Selection:
- Tap the "Activity" dropdown
- Choose what type of work you'll be doing
- Examples: General Labor, Framing, Electrical, Plumbing
- May be required by your company (marked with red asterisk *)
Notes (Optional):
- Add any relevant information about your shift
- Examples: "Working on south building", "Equipment inspection before start"
- Visible to administrators
- Review your selections
- Tap "Confirm" or "Clock In"
- You're now clocked in!
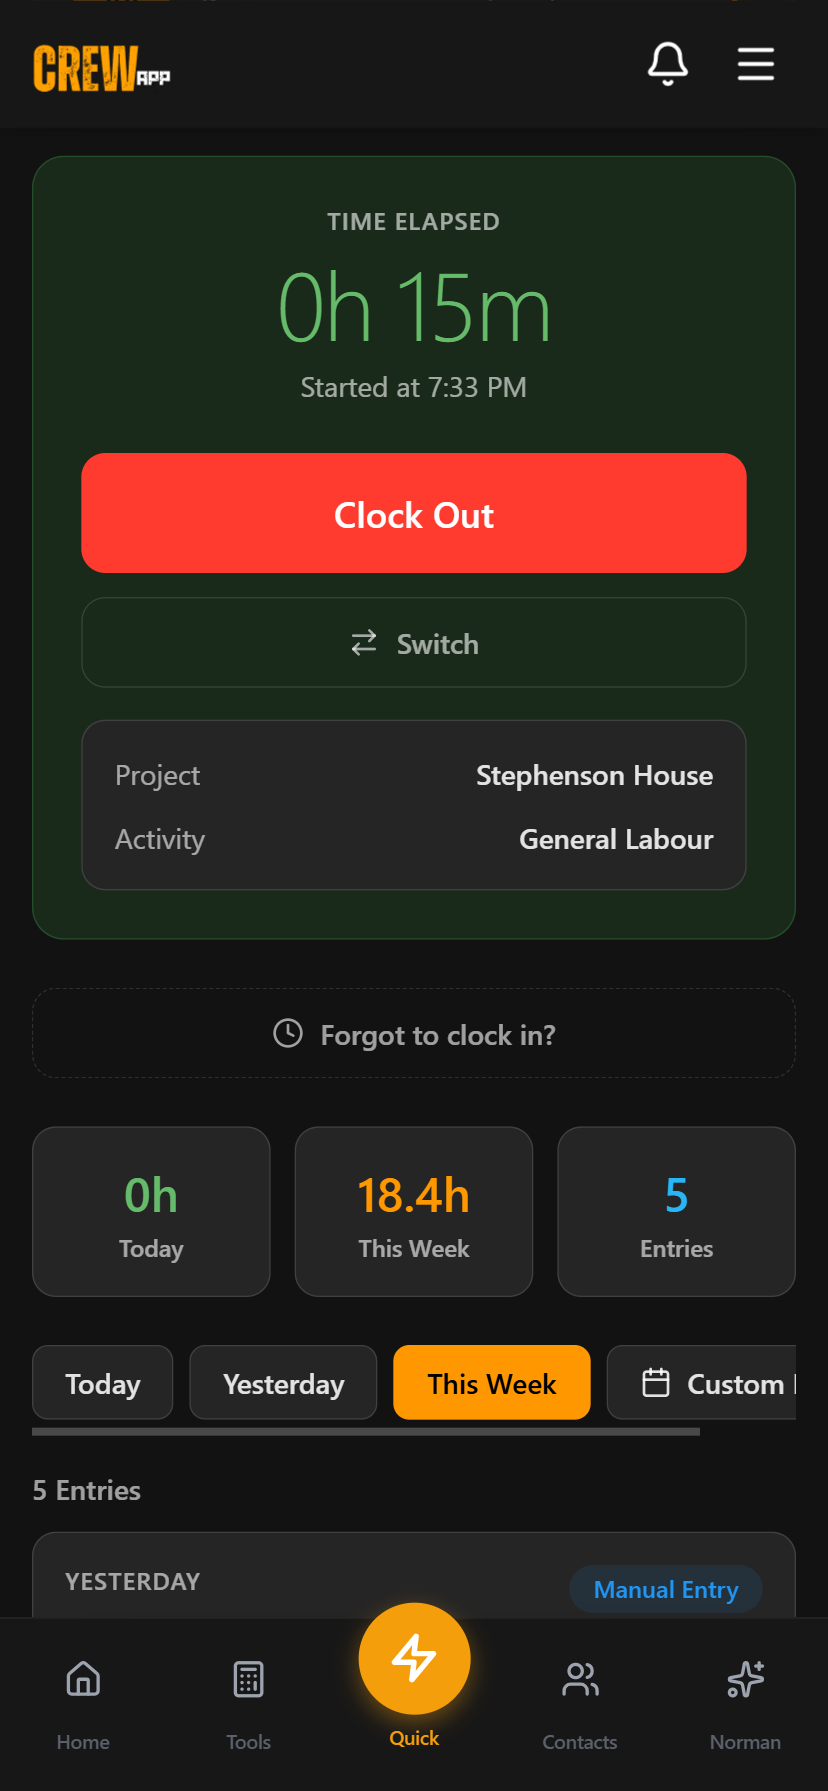
What Happens When You Clock In
- Timer starts: Your elapsed work time begins counting
- Status changes: The button changes from "Clock In" to "Clock Out"
- Icon turns green: Visual indicator that you're currently working
- Stats update: Your dashboard shows you're clocked in
- Real-time tracking: Elapsed time updates every minute
Clocking Out
When to Clock Out
Clock out when you:
- Finish your work day
- Take your unpaid lunch break
- Leave the job site for the day
- Complete your shift
- Open the Time Clock page
- Look for the "Clock Out" button
- The clock icon will be green (clocked in status)
Before clocking out, you can add notes about what you accomplished.
Notes Field (Optional):
- Describe what you completed during this time entry
- Examples: "Finished framing bay 2", "Completed electrical rough-in"
- Helps with documentation and billing
- Review your work duration
- Check your notes
- Tap "Confirm" or "Clock Out"
What Happens When You Clock Out
- Timer stops: Your work time is recorded
- Duration calculated: Hours and minutes are automatically computed
- Status changes: Button returns to "Clock In"
- Icon turns orange: Visual indicator that you're clocked out
- Entry created: Time entry appears in your history as "Submitted"
- Stats update: Your daily and weekly hours are updated
Switch Task
New in v1.30.0 - Switch between tasks without losing time!
What is Switch Task?
The Switch Task feature lets you transition from one task to another seamlessly. It clocks you out of your current task and immediately clocks you into a new one at the same timestamp - no gaps in your time tracking.
When to Use Switch Task
Use Switch Task when:
- Moving to a different project on the same job site
- Changing from one type of work to another (framing → electrical)
- Starting a different phase of the project
- You want continuous time tracking across different tasks
Don't Use Switch Task For:
- Lunch breaks (just clock out)
- Leaving the job site (clock out instead)
- End of day (clock out normally)
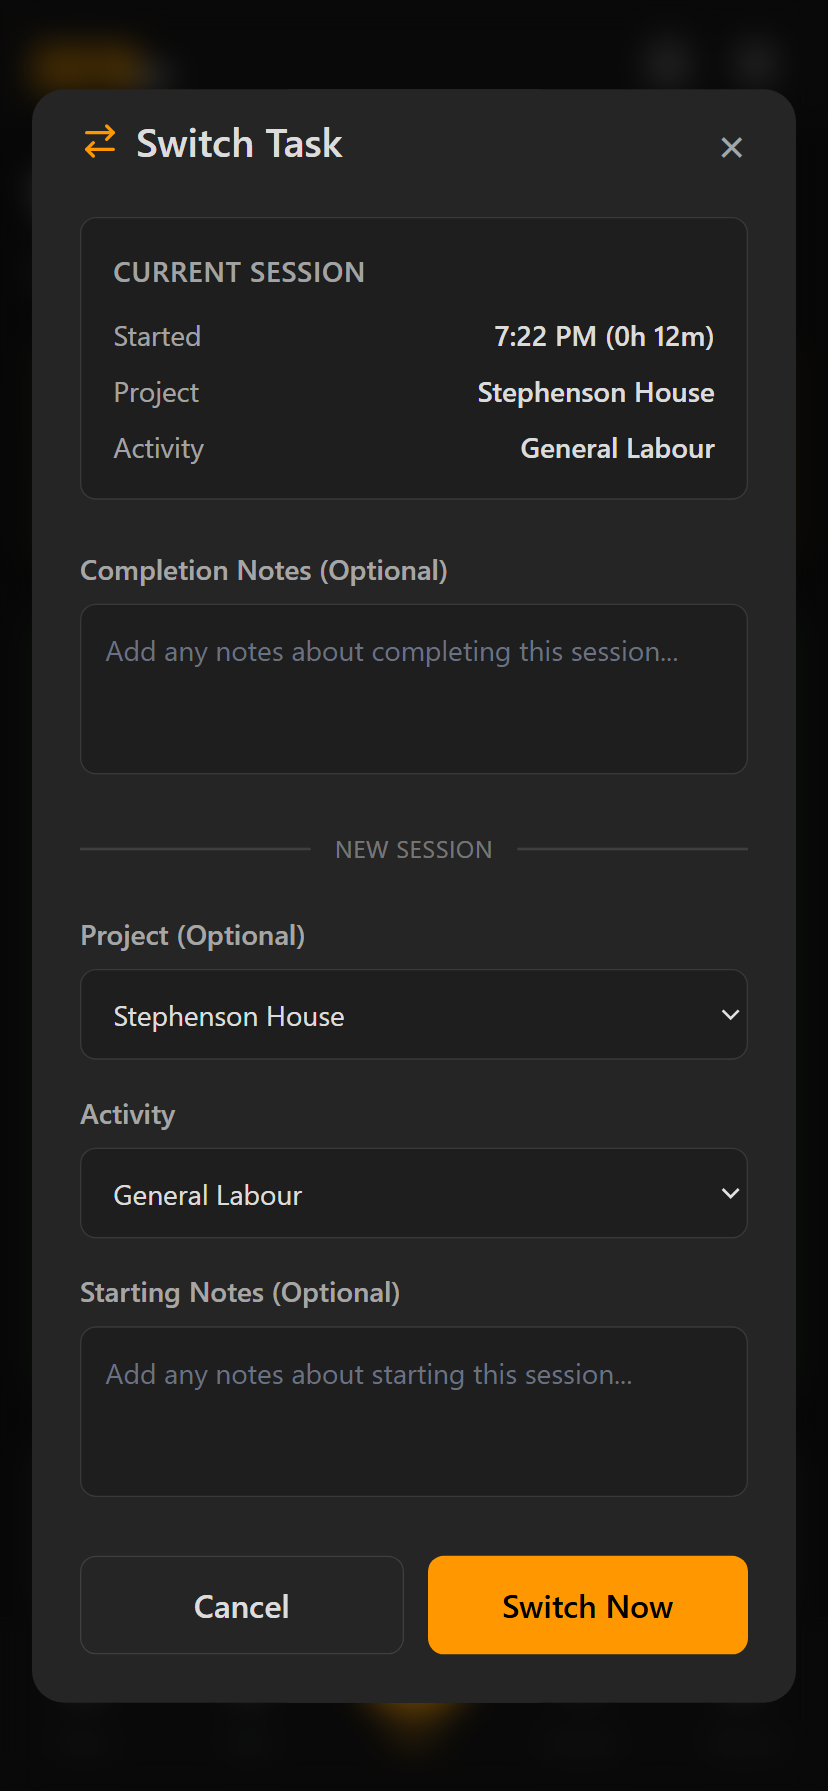
How to Switch Tasks
- While clocked in, look for "Switch Task" button
- It appears below the Clock Out button
- Tap to open the switch dialog
Completion Notes (Optional):
- Describe what you finished
- Example: "Completed framing on north wall"
- Helps document your work
New Project (Optional):
- Select the next project you're working on
- Can be the same project or different
New Activity:
- Choose the type of work you're starting
- Required if your company requires activities
Starting Notes (Optional):
- Describe what you're about to work on
- Example: "Starting electrical rough-in"
- Review your completion and starting information
- Tap "Confirm" or "Switch"
Adding Missed Time Entries
New in v1.31.0 - Add time entries you forgot to track!
What Are Manual Time Entries?
If you forget to clock in or out, you can add a manual time entry to record your work hours. Manual entries go through the same approval process as regular clock in/out entries.
When to Add Missed Entries
- You forgot to clock in when you arrived
- You forgot to clock out when you left
- Your phone battery died during the day
- App wasn't working when you tried to clock in/out
- You realized at the end of the week you're missing a day
How to Add a Missed Entry
- Open the Time Clock page
- Look for "Add Missed Entry" button
- Tap to open the form
Date (Required):
- Select the day you worked
- Can be today or a past date
- Cannot be in the future
Clock In Time (Required):
- When you started work
- Use the time picker to set hours and minutes
- Example: 7:00 AM
Clock Out Time (Required):
- When you finished work
- Must be after clock in time
- Example: 3:30 PM
Duration Calculated Automatically:
- The system calculates hours and minutes
- Example: 7:00 AM to 3:30 PM = 8h 30m
Project (Optional):
- Select the project you worked on
- Should match your schedule
Activity (Optional/Required):
- Choose your work activity
- May be required by your company
Notes (Optional):
- Explain why you're adding this manually
- Example: "Forgot to clock in - phone battery died"
- Helps administrators understand the situation
- Review all times and details
- Check for any overlap warnings
- Tap "Submit" or "Create Entry"
Viewing Your Hours
Stats Dashboard
At the top of your Time Clock page, you'll see three important stats:
Today's Hours:
- Total hours worked today
- Includes approved and submitted entries
- Updates in real-time
This Week:
- Total hours for the current week (Sunday to Saturday)
- Cumulative across all days
- Great for tracking your weekly progress
Total Entries:
- Count of all your time entries
- All statuses (submitted, approved, rejected)
Filtering Your Time Entries
View your time entries by different date ranges to find specific entries or review your history.
Quick Filters
Today:
- Shows all entries for today
- Default view when you open Time Clock
- Best for daily tracking
Yesterday:
- Shows all entries from yesterday
- Useful for reviewing previous day's work
This Week:
- Shows all entries from Sunday to Saturday (current week)
- Weekly overview
- Most common view for checking weekly hours
Custom Date Range
For viewing entries from specific date periods, use the Custom Range filter.
To Select Custom Range:
- Tap "Custom Range" button
- A date picker modal opens
- Start Date: Select the beginning of your range
- End Date: Select the end of your range
- Tap "Apply" or "Confirm"
Use Cases:
- Review a specific pay period
- Check hours from last month
- Prepare for timesheet submission
Editing Time Entries
What You Can Edit
You can edit your time entries before they are approved. Once approved, only administrators can make changes.
Editable Time Entries:
- Status: Submitted (blue badge)
- Status: Approved (green badge) - contact your administrator
- Status: Rejected (red badge) - you can delete and recreate
How to Edit a Time Entry
- Use filters to locate the time entry
- Look for entries with "Submitted" status
- Tap the three-dot menu (⋮) on the time entry card
- Select "Edit"
- Edit form opens
You Can Change:
- Clock In Time: Adjust start time
- Clock Out Time: Adjust end time
- Project: Change project assignment
- Activity: Change activity code
- Notes: Update or add notes
Duration Updates Automatically:
- As you change clock in/out times, duration recalculates
- Validation ensures clock out is after clock in
- Review your changes
- Tap "Save" or "Update Entry"
Deleting Time Entries
You can delete submitted entries if you created one by mistake.
To Delete:
- Tap the three-dot menu (⋮) on the entry
- Select "Delete"
- Confirm deletion
When to Delete:
- Duplicate entries (clocked in twice by mistake)
- Test entries
- Completely incorrect entries that should be replaced
Alternative: Edit the entry instead of deleting if you just need to fix details.
Understanding Entry Status
Your time entries go through an approval workflow. Each status has a different meaning and appearance.
Status Types
Submitted (Blue Badge):
- Entry is waiting for administrator approval
- You can still edit or delete
- Default status when you clock out or add manual entry
- Action: None required, wait for approval
Approved (Green Badge):
- Administrator has approved your time entry
- Locked - you cannot edit or delete
- Will be included in payroll
- Action: None required
Rejected (Red Badge):
- Administrator rejected your time entry
- Shows rejection reason below the entry
- You cannot edit rejected entries
- Action: Review reason, delete entry, create corrected entry
Rejection Reasons
If an entry is rejected, your administrator will provide a reason explaining why.
Common Rejection Reasons:
- "Clock in time too early - shift starts at 7 AM"
- "No project assignment - please specify job site"
- "Duration exceeds scheduled shift hours"
- "Overlaps with another time entry"
What to Do:
- Read the rejection reason carefully
- Delete the rejected entry
- Create a new entry (manual or clock in/out) with corrections
- Or contact your administrator if you disagree
Dashboard Widget
Your home page includes a Time Clock widget for quick status checking.
Clocked In Status
When you're currently working, the widget shows:
- Green indicator: Visual "clocked in" status
- Elapsed time: How long you've been working
- Current project: What you're working on (if assigned)
- Real-time updates: Updates every minute
Clocked Out Status
When you're not currently working, the widget shows:
- Weekly hours summary: Your total hours this week
- Quick stats: Entries and hours
- One-tap navigation: Tap to open full Time Clock page
Using the Widget
Quick Actions:
- Tap the widget to open the full Time Clock page
- Check status at a glance without navigating away from home
- Monitor elapsed time throughout the day
Tips & Best Practices
Clock In Right When You Arrive
- Don't wait until after your morning meeting or coffee
- Clock in as soon as you're ready to work
- Ensures accurate tracking from the start
Select Project and Activity Every Time
- Even if optional, selecting these helps with tracking
- Makes time entry approval faster for administrators
- Provides better data for project billing and cost analysis
Add Meaningful Notes
- Completion notes help document your work
- Useful for billing and progress tracking
- Examples: "Completed 50% of framing", "Installed 200 ft of conduit"
Use Switch Task Instead of Clocking Out
- Keeps continuous time tracking
- Better than clocking out and back in
- No gaps in your timeline
Review Your Entries Weekly
- Check "This Week" filter every Friday
- Ensure all entries are submitted
- Catch any missed days before payroll cutoff
Don't Forget Lunch Breaks
- Clock out for unpaid lunch breaks
- Clock back in when returning to work
- Follow your company's break policy
Add Manual Entries Promptly
- Don't wait until end of pay period
- Add missed entries as soon as you realize
- Easier to remember details when recent
Explain Manual Entries
- Always add notes to manual entries
- Explain why it's manual: "Forgot to clock in", "Phone died"
- Helps administrators approve faster
Check Your Dashboard Widget
- Glance at your widget to confirm you're clocked in
- Easy way to check elapsed time
- Reminder if you forgot to clock out
Troubleshooting
Possible Reasons:
- You're already clocked in
- Activity is required but not selected
- No internet connection
- Feature is disabled for your company
Solutions:
- Check if you're already clocked in (green clock icon)
- Scroll down to see if you have an active entry
- If activity dropdown has a red asterisk (*), select an activity
- Check your internet connection
- Try refreshing the page (pull down to refresh)
- Contact your administrator if issue persists
Solutions:
- Refresh the page (pull down)
- Check for an error message
- Ensure you confirmed the clock in
- Look for your active entry in the entry list below
- Force quit and reopen the app
Solution:
- Check your time entries for yesterday
- If there's an entry still active (no clock out time), edit it:
- Tap three-dot menu → Edit
- Set clock out time to when you actually left
- Save
- If no entry exists, add a manual entry for yesterday
What it means:
- You already have a time entry that covers part or all of this time period
- Example: Trying to add 8 AM - 4 PM, but you already have 7 AM - 3 PM
Solutions:
- Review your existing entries for that day
- Adjust your manual entry times to avoid overlap
- Or delete the incorrect entry and create a new one
- If both entries are correct (different projects), contact your administrator
Steps:
- Read the rejection reason carefully
- Understand what needs to be corrected
- Delete the rejected entry
- Create a new entry (manual or regular) with corrections
- Add notes explaining the situation
- If you disagree with the rejection, contact your administrator
Possible Reasons:
- Entry is already approved (green badge) - only admins can edit
- Entry is rejected (red badge) - delete and recreate instead
- You don't have permission
- Internet connection issue
Solutions:
- Check entry status (badge color)
- If approved, contact your administrator to request changes
- If rejected, delete and create a new corrected entry
- Ensure you're editing a "Submitted" (blue) entry
Steps to Verify:
- Filter by "This Week" to see all entries
- Check each entry's duration
- Look for:
- Missing days (forgot to clock in/out)
- Incorrect clock out times
- Duplicate entries
- Rejected entries (don't count toward hours)
- Add manual entries for missing days
- Edit submitted entries to fix times
- Contact administrator if approved entries need correction
Need More Help?
If you have questions about the time clock or need assistance, here are your options: