Managing Time Clock
Learn how to monitor your crew, approve time entries, and manage time tracking data
What You'll Learn
- Monitoring crew members who are currently clocked in
- Approving and rejecting time entries
- Editing time entries for your crew
- Creating manual time entries for crew members
- Managing activity codes
- Filtering and exporting time data
- Using the audit log to track changes
- Best practices for time approval workflows
Work in Progress
This guide is currently being vetted for accuracy. If you have questions or need assistance, please contact us directly.
Overview
Time Clock Management gives you complete oversight of your crew's time tracking. Monitor who's currently working, approve time entries, make corrections, export data for payroll, and maintain accurate records with full audit trails.
Key Capabilities:
- Monitor active crew members in real-time
- Approve or reject time entries with reasons
- Bulk approve multiple entries at once
- Edit any time entry (with full audit trail)
- Create manual entries for crew members who forgot to clock in/out
- Manage custom activity codes for categorization
- Filter by crew member, project, status, and date range
- Export filtered data to CSV for payroll
- View complete audit history of all changes
Accessing Time Clock Management
Time Clock Management is accessed through the Admin Settings Panel.
- On desktop: Access the menu from the top navigation bar
- On mobile: Tap the hamburger menu icon (☰) on the right
- Select "Admin Settings Panel" from the menu
- The panel slides in from the left
- Look for the Time Clock Management card (⏰ or ✅ icon)
- Tap the card to open Time Clock Management
- The admin time clock page loads
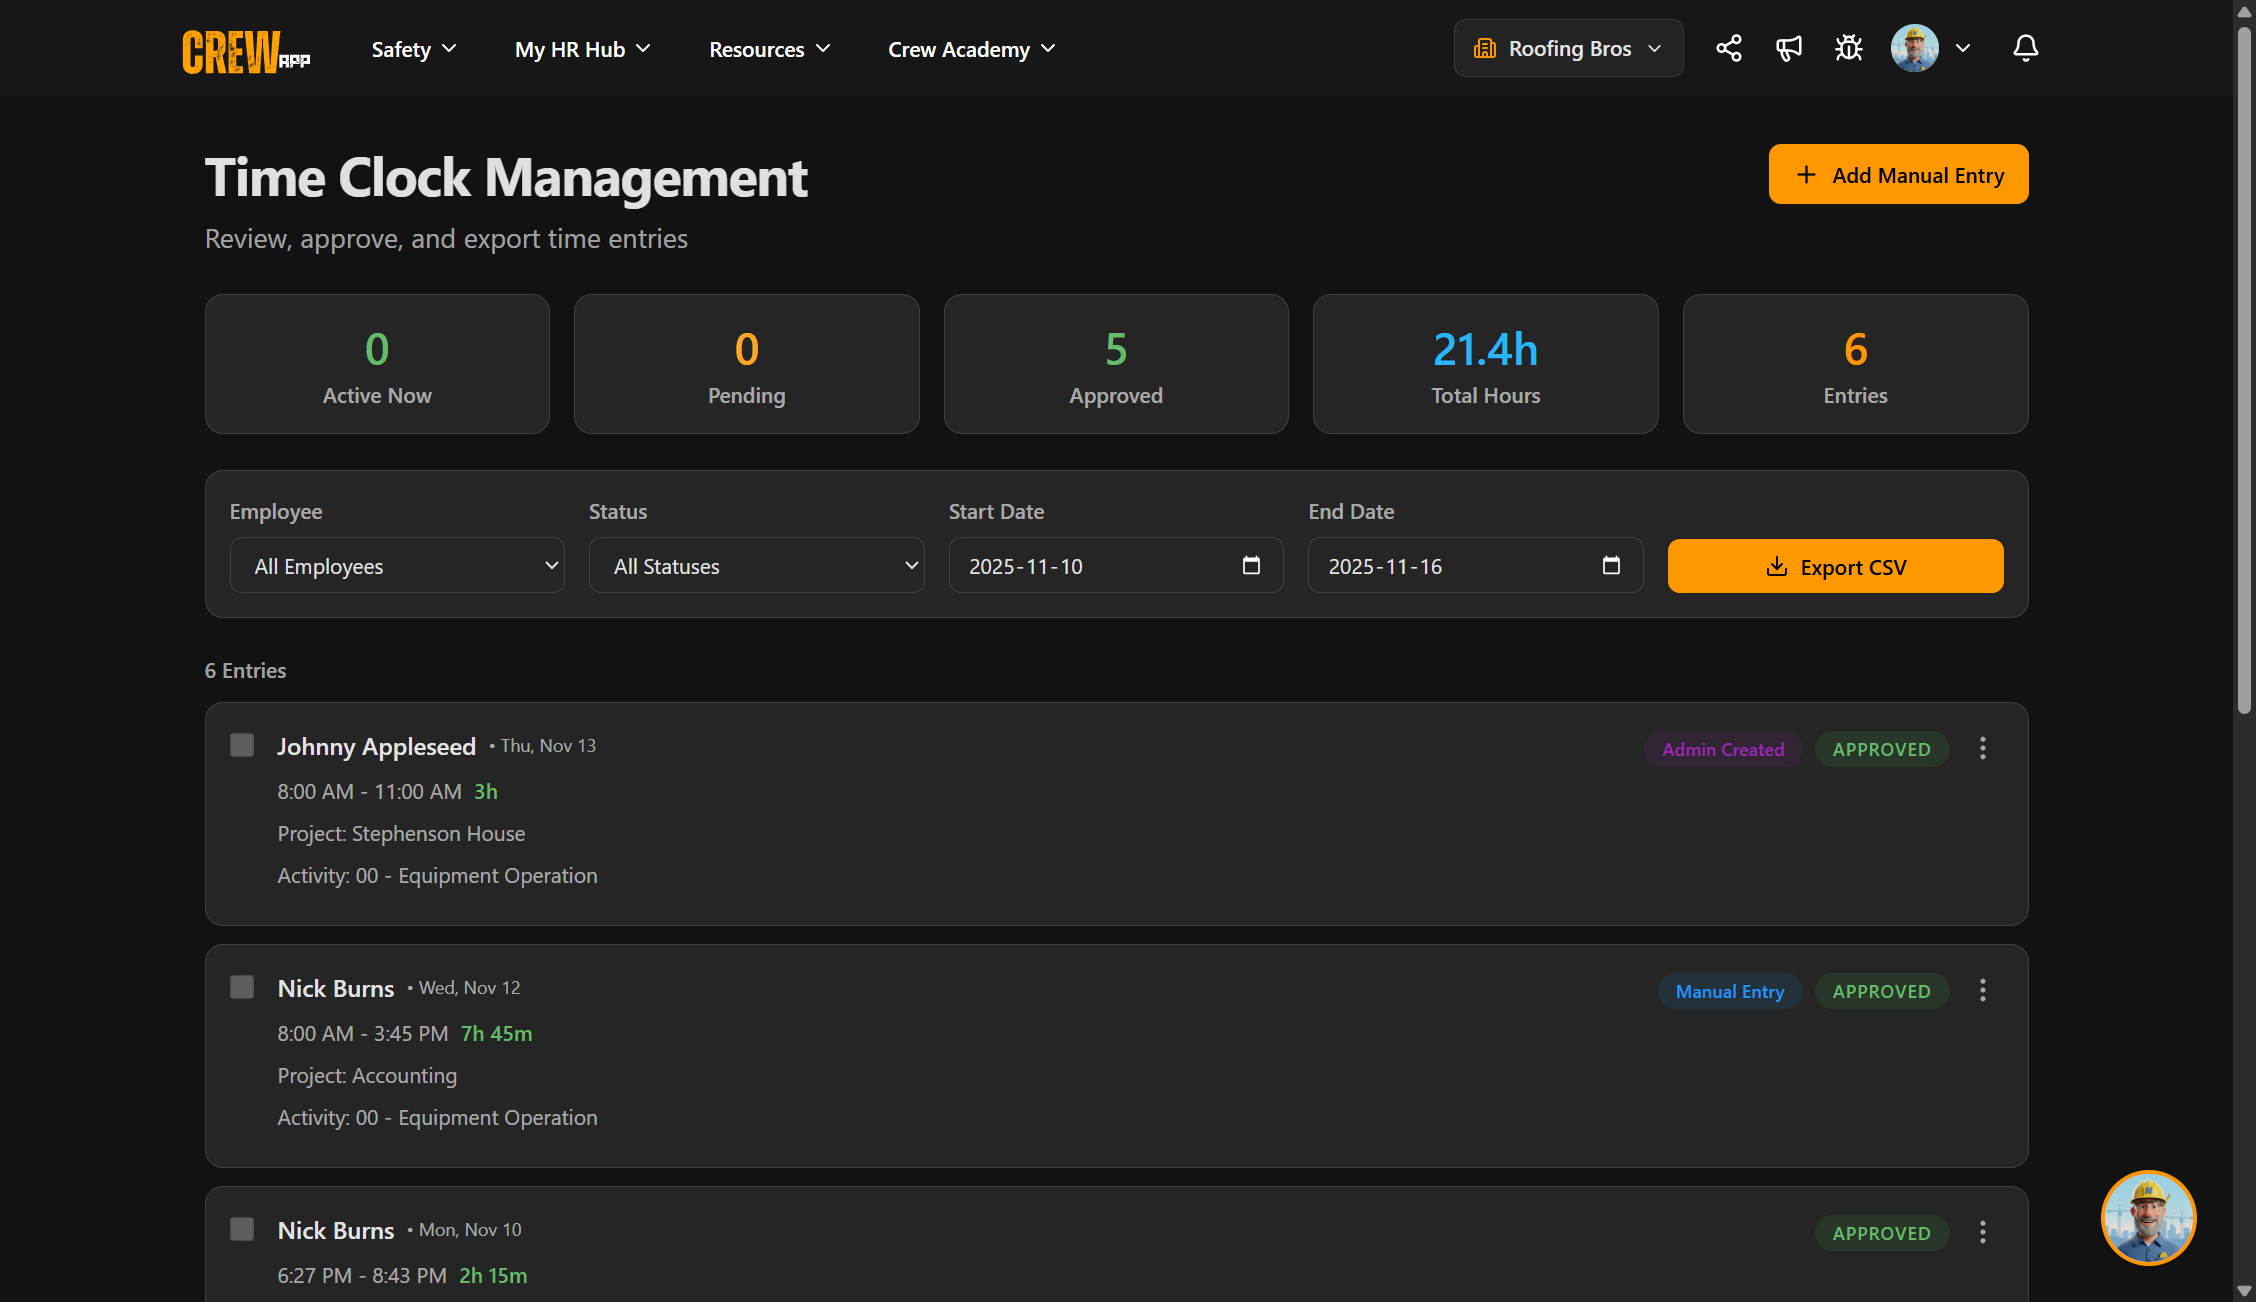
Understanding the Admin Interface
Main Interface Components
Key Elements:
1. Summary Statistics Panel (Top)
- Pending Count: Entries awaiting approval
- Approved Count: Total approved this period
- Total Hours: Sum of hours in current filter
- Total Entries: Count of all filtered entries
- Active Now: Currently clocked-in crew members
2. Filter Controls
- User Filter: Dropdown to select specific crew member (or "All Users")
- Project Filter: Filter by job site
- Status Filter: Active Now, Submitted, Approved, Rejected, All
- Date Range Filter: This Week, Last Week, This Month, Custom
3. Bulk Actions
- Select All checkbox: Select all visible entries
- Approve Selected button: Bulk approve checked entries
- Export CSV button: Download filtered data
4. Time Entry List
- Individual time entry cards
- Each shows: Crew member name, date, times, duration, project, status
- Action menu (⋮) for approve/reject/edit/delete
- Checkbox for bulk selection
- Pagination: 15 entries per page
Desktop vs. Mobile Layout
Desktop:
- Summary stats in horizontal row
- Side-by-side filters
- Full table view
- Larger action buttons
Mobile:
- Stacked summary cards
- Vertical filter layout
- Card-based entry display
- Collapsible filters
Active Now: Monitoring Clocked-In Crew
What is Active Now?
Active Now is the default view that shows all crew members currently clocked in and working.
Why It's Useful:
- See who's currently on the job
- Real-time duration tracking
- Verify crew are at correct projects
- Monitor compliance with schedules
- Quickly spot issues (wrong project, missing notes)
Active Now Display
Each active entry shows:
- Crew Member Name: Who's clocked in
- Clock In Time: When they started
- Elapsed Duration: How long they've been working (updates every minute)
- Current Project: What job site (if assigned)
- Activity: What they're doing (if assigned)
- Notes: Any notes they added when clocking in
- Real-time Indicator: Green dot or "Active" badge
Using Active Now View
To Access:
- Open Time Clock Management
- Status filter defaults to "Active Now"
- See all currently working crew members
Common Use Cases:
Morning Check-In
Review Active Now at the start of the day:
- Verify expected crew members have clocked in
- Check if anyone clocked into wrong project
- Ensure activities are assigned correctly
- Contact crew members who should be working but aren't clocked in
Mid-Day Spot Check
Check Active Now during the day:
- Confirm crew are still clocked in
- Watch for unusually long durations (forgot to clock out?)
- Verify lunch break compliance
End of Day Review
Review Active Now before leaving:
- Ensure all crew members have clocked out
- Reach out to anyone still showing active
- Prevent overnight time entries from forgotten clock-outs
Editing Active Entries
You can edit active entries while crew members are still clocked in.
What You Can Edit:
- Project assignment
- Activity code
- Notes
- Clock in time (wait for clock out, then edit)
- Clock out time (not clocked out yet)
To Edit Active Entry:
- Find the active entry
- Tap three-dot menu (⋮) → Edit
- Change project, activity, or notes
- Save
Filtering Time Entries
Filter by Crew Member
View time entries for a specific crew member.
To Filter by Crew Member:
- Open the "User" or "Crew Member" dropdown
- Select a crew member's name
- All other filters still apply
Use Cases:
- Review one person's week before payroll
- Verify a specific crew member's hours
- Check entries for a crew member who reported an issue
- Monitor new employee's time tracking habits
Filter by Project
View time entries for a specific job site.
To Filter by Project:
- Open the "Project" dropdown
- Select a project name
- See all time entries assigned to that project
Use Cases:
- Calculate total labor hours on a project
- Verify crew hours match project budget
- Review time entries for billing purposes
- Identify which crew members worked on which projects
Filter by Status
View entries based on their approval status.
Status Options:
Active Now (Default):
- Currently clocked-in crew members
- Real-time elapsed time
- Green active indicators
Submitted:
- Entries waiting for your approval
- Blue badges
- Action required
Approved:
- Entries you've already approved
- Green badges
- Locked from crew edits
Rejected:
- Entries you've rejected
- Red badges
- Show rejection reasons
All:
- Every time entry regardless of status
- Useful for comprehensive reviews
Filter by Date Range
View entries from specific time periods.
Quick Date Ranges:
This Week:
- Sunday to Saturday (current week)
- Default view
- Most common for weekly approval
Last Week:
- Previous Sunday to Saturday
- Review before finalizing payroll
- Useful for historical review
This Month:
- First day to last day of current month
- Monthly reporting
- Budget tracking
Custom Range:
- Select any start and end date
- Specific pay periods
- Historical data review
- Exact date range needed
To Use Custom Range:
- Select "Custom Range"
- Pick Start Date
- Pick End Date
- Tap "Apply"
Combining Filters
All filters work together for precise data views.
Example Combinations:
Scenario 1: Review John's submitted entries this week
- User: John Smith
- Status: Submitted
- Date: This Week
- Project: All
Scenario 2: All approved time on Balmoral project this month
- User: All Users
- Status: Approved
- Date: This Month
- Project: Balmoral Renovation
Approving Time Entries
Single Entry Approval
Approve individual time entries one at a time.
To Approve Single Entry:
- Find the time entry (filter by "Submitted" status)
- Tap the three-dot menu (⋮) on the entry card
- Select "Approve"
- Confirm approval
Bulk Approval
Approve multiple time entries at once for faster processing.
Step 1: Select Entries
- Filter to show entries you want to approve (e.g., Status: Submitted, Date: This Week)
- Check the box next to each entry you want to approve
- Or use "Select All" checkbox at the top
Step 2: Approve
- Look for "Approve Selected" button
- Tap the button
- Review count of entries to approve
- Confirm bulk approval
Bulk Approval Best Practices
Weekly Approval Workflow
Monday Morning Routine:
- Filter: Status = Submitted, Date = Last Week
- Review each entry for accuracy
- Fix any issues (edit times, projects, etc.)
- Select all correct entries
- Bulk approve
- Handle exceptions individually
Result: Last week approved and ready for payroll export.
Daily Quick Approval
End of Each Day:
- Filter: Status = Submitted, Date = Today
- Quick review for obvious issues
- Approve all today's entries
- Address any problems immediately while fresh
Result: Reduces end-of-week backlog.
Rejecting Time Entries
When to Reject Entries
Reject time entries when they need correction or are inaccurate.
Common Rejection Reasons:
- Clock in/out times don't match schedule
- Wrong project assigned
- Duration is unrealistic or incorrect
- Overlapping time entries
- Missing required activity code
- Notes indicate non-work time
How to Reject an Entry
Step 1: Open Reject Dialog
- Find the time entry
- Tap three-dot menu (⋮) → "Reject"
- Rejection reason dialog opens
Step 2: Provide Rejection Reason
- Enter a clear, specific reason
- Explain what needs to be corrected
- Be professional and helpful
Examples of Good Rejection Reasons:
- "Clock in time too early - scheduled shift starts at 7:00 AM, not 6:00 AM"
- "Please select Balmoral project - you were scheduled there this day"
- "Duration exceeds 8 hours without approved overtime - please verify times"
- "Overlaps with your 8 AM - 4 PM entry - please correct times"
Examples to Avoid:
- "Wrong" (not helpful)
- "Fix this" (unclear what's wrong)
- "No" (unprofessional)
Step 3: Confirm Rejection
- Review your reason
- Tap "Reject" or "Confirm"
After Rejecting
What the Crew Member Sees:
- Red "Rejected" badge on entry
- Your rejection reason displayed
- Cannot edit rejected entries
- Must delete and create new corrected entry
Follow Up:
- Monitor for corrected entry submission
- Be available to answer crew member questions
- Approve corrected entry promptly
Editing Time Entries
Admin Edit Capabilities
As an administrator, you can edit any time entry at any status, even after approval.
What You Can Edit:
- Clock in time
- Clock out time
- Date
- Project assignment
- Activity code
- Notes
- Can edit submitted, approved, or rejected entries
How to Edit a Time Entry
Step 1: Open Edit Dialog
- Find the time entry
- Tap three-dot menu (⋮) → "Edit"
- Edit form opens with current values
Step 2: Make Changes
Time Changes:
- Adjust clock in time using time picker
- Adjust clock out time using time picker
- Duration recalculates automatically
Project/Activity Changes:
- Select different project from dropdown
- Select different activity code
- Add or modify notes
Step 3: Review Disclaimer
When editing a crew member's entry, you'll see a disclaimer:
Step 4: Save Changes
- Review all changes
- Tap "Save" or "Update Entry"
Common Editing Scenarios
Crew Member Forgot to Clock Out
Scenario: Crew member went home but didn't clock out. Entry shows clock in but no clock out (still active).
Solution:
- Find the active entry
- Edit → Set clock out time to when they actually left
- Add note: "Clocked out by admin - crew member forgot"
- Save
Entry is now complete with correct hours.
Fix Incorrect Times
Scenario: Crew member clocked in at 6:00 AM but shift starts at 7:00 AM. Entry already approved.
Solution:
- Find the approved entry
- Edit → Change clock in from 6:00 AM to 7:00 AM
- Duration updates from 9h to 8h
- Add note: "Adjusted to scheduled shift time"
- Save
Entry now reflects actual work hours.
Creating Manual Entries for Crew Members
New in v1.31.0 - Create time entries on behalf of your crew members.
When to Create Manual Entries
Create manual entries for crew members when:
- Crew member forgot to clock in/out and can't fix it themselves
- Crew member was unable to access the app (no phone, battery died)
- Retroactive time entry for past work
- Special circumstances (emergency, equipment failure)
How to Create Manual Entry for a Crew Member
Step 1: Open Manual Entry Form
- Look for "Add Manual Entry" or "Create Entry" button
- Tap to open the form
Step 2: Select Crew Member
Crew Member (Required):
- Select the crew member from dropdown
- Only shows crew members in your company
- Searchable list
Step 3: Enter Time Details
Date (Required):
- Select the work date
- Can be today or past dates
- Cannot be in future
Clock In Time (Required):
- When crew member started
- Use time picker
Clock Out Time (Required):
- When crew member finished
- Must be after clock in time
- Duration calculates automatically
Step 4: Add Project and Activity
Project (Optional):
- Assign to job site
- Helps with billing and tracking
Activity (Optional/Required):
- Select activity code
- May be required per company settings
Step 5: Add Notes
Notes (Recommended):
- Explain why you're creating this manually
- Example: "Created by admin - crew member's phone died"
- Example: "Retroactive entry - forgot to clock in"
- Shows transparency in audit log
Step 6: Submit
- Review all details
- Check for overlap warnings
- Tap "Submit" or "Create Entry"
Manual Entry Best Practices
- Always Add Explanatory Notes: Explain the situation clearly, helps with future audits
- Verify with Crew Member First: Confirm the times, double-check project and activity
- Use Correct Entry Source: Manual entries are automatically tagged as "Manual (Admin)" for transparency
- Follow Up: Remind crew member to clock in/out properly, address recurring issues
Managing Activity Codes
Activity codes help categorize time entries for accounting, billing, and reporting.
What Are Activity Codes?
Activities are work categories that crew members select when clocking in.
Each Activity Has:
- Name: Full description (e.g., "General Labor")
- Code: Short accounting code (e.g., "GL")
- Description: Optional explanation
- Status: Active (shown in dropdowns) or Inactive (hidden)
Examples:
- FR - Framing
- DW - Drywall
- EL - Electrical Work
- PL - Plumbing
- GL - General Labor
- SM - Safety Meeting
Accessing Activity Management
Path: Admin Settings Panel → Resources → Manage Activities
Who Can Access:
- Developers
- Company Owners
- Administrators
Creating a New Activity
To Create Activity:
- Navigate to Manage Activities
- Tap "Add Activity" button
- Fill in the form:
- Name (required): Full activity name (max 100 characters)
- Code (required): Short code (max 20 characters, auto-uppercase)
- Description (optional): When to use this activity
- Tap "Save"
Activity Code Best Practices
Keep Codes Short
Good: FR, DW, EL, PL, GL
Avoid: FRAMING, DRYW, ELEC123
Short codes are easier to remember and scan.
Align with Accounting System
If you use accounting software with cost codes:
- Match your activity codes to your accounting codes
- Makes CSV export seamless
- Simplifies payroll integration
Limit Total Number
Aim for: 15-30 activities
Avoid: 100+ hyper-specific codes
Too many activities confuses crew members and slows clock-in.
Requiring Activity Selection
Toggle Setting: Require Activity ON/OFF
When ON:
- Crew members must select an activity when clocking in
- Activity dropdown marked with red asterisk (*)
- Validation prevents clock-in without selection
When OFF (Default):
- Activity selection is optional
- Crew members can clock in without selecting
Exporting to CSV
Export time entry data for payroll processing, accounting, or reporting.
What Gets Exported
CSV Includes:
- Crew member name
- Date
- Clock in time
- Clock out time
- Duration (in hours)
- Project name
- Activity code and name
- Status (Submitted, Approved, Rejected)
- Notes
- Entry source (Clock In/Out, Manual User, Manual Admin)
How to Export
Step 1: Filter Your Data
- Use filters to select exactly what you want to export
- Examples:
- Date: Last Week
- Status: Approved
- User: All
- Project: All
Step 2: Export
- Tap "Export CSV" button
- File downloads automatically
Step 3: Open in Excel/Sheets
- Open the downloaded file
- Review data
- Process for payroll or import into accounting software
Filename Format: time-entries-YYYY-MM-DD.csv
Export Use Cases
Weekly Payroll
Process:
- Filter: Date = Last Week, Status = Approved
- Export CSV
- Open in Excel
- Calculate total hours per crew member
- Process payroll
Project Billing
Process:
- Filter: Project = Balmoral Renovation, Date = This Month, Status = Approved
- Export CSV
- Sum total hours for project
- Calculate labor costs
- Invoice client
Viewing Audit History
Feature: Complete audit trail for all time entry changes (v1.25.0)
What is the Audit Log?
The audit log shows every change made to a time entry, creating complete transparency and accountability.
Accessing Audit History
To View:
- Find a time entry
- Look for "View History" or "Audit Log" button/link
- Tap to open audit timeline
What the Audit Log Shows
Event Types:
- Created: When entry was first created (clock in)
- Clock Out: When entry was completed
- Edited: Any modifications to times, project, notes
- Approved: When and by whom entry was approved
- Rejected: When and by whom entry was rejected (with reason)
- Deleted: If entry was deleted
For Each Event:
- Timestamp: Exact date and time
- User: Who performed the action
- Changes: What was modified (old value → new value)
- Notes: Any notes added with the change
Using Audit Logs
Accountability:
- See exactly who made changes and when
- Verify admin edits are documented
- Track approval workflow
Troubleshooting:
- Investigate discrepancies
- Understand why hours changed
- Review crew member concerns about time entries
Compliance:
- Labor law compliance
- Payroll audits
- Dispute resolution
Tips & Best Practices
Daily Active Now Check
- Review Active Now each morning to verify crew clocked in
- Check at end of day to catch forgotten clock-outs
- Reach out to crew members showing unusually long durations
Timely Approval
- Approve entries daily or every other day to reduce backlog
- Don't wait until payroll deadline to approve entire week
- Crew members appreciate quick approval confirmations
Clear Rejection Reasons
- Be specific and helpful when rejecting
- Explain exactly what needs correction
- Offer guidance: "Please change clock in to 7:00 AM per your schedule"
Document Edits
- Always add notes when editing entries
- Explain why: "Adjusted per conversation with John"
- Creates clear audit trail
Weekly Review Routine
- Set aside time every Monday for last week's approval
- Filter: Date = Last Week, Status = Submitted
- Bulk approve after quick review
- Export approved entries for payroll
Communicate with Crew
- Let crew members know your approval schedule
- Set expectations: "Time entries approved every Monday and Thursday"
- Address recurring issues in team meetings
Use Filters Effectively
- Start broad, then narrow (All → This Week → Specific User)
- Save time by filtering before bulk operations
- Export only what you need with targeted filters
Verify Against Schedule
- Cross-reference time entries with schedules
- Ensure crew members clocked into assigned projects
- Flag mismatches for correction
Monitor Patterns
- Watch for trends: Same crew member frequently forgets to clock in
- Address training gaps: Crew unsure which activity to select
- Improve processes: Automate reminders if issues persist
Troubleshooting
Steps to Verify:
- Check Active Now view - is entry there?
- Filter by that crew member - see any entries today?
- Check all statuses (not just submitted)
- Ask crew member to show you their Time Clock page
- Verify they confirmed the clock in
Solution:
- If no entry exists, create a manual entry for the crew member
- If entry exists but crew member doesn't see it, have them refresh
- Contact support if data is truly missing
Possible Reasons:
- Entry is already approved (check status badge)
- Entry is currently active (not clocked out yet)
- Permission issue
- Internet connection problem
Solutions:
- Check entry status - green means already approved
- If active, ask crew member to clock out first
- Refresh the page
- Verify your admin permissions
Likely Cause: Crew member forgot to clock out, entry still active overnight or multiple days.
Solution:
- Check if entry is active (no clock out time)
- Edit entry → Set clock out time to when they actually left
- Add note: "Clocked out by admin - crew member forgot"
- Save
- Remind crew member to clock out at end of shift
Check:
- Your current filters - export uses active filters
- If Status = "Active Now" and no one is clocked in, export will be empty
- Change filters to include the data you want
- Example: Status = All, Date = This Month
- Export again
Need More Help?
If you have questions about time clock management or need assistance, here are your options: